DIY Dollar Tree Faux Sweater Pumpkins
Insanely cute DIY Dollar Tree farmhouse faux sweater pumpkins you will want to make.
Ingredients
- Foam Pumpkin – Dollar Store
- Chunky Yarn – Muted Orange
- Acrylic Craft Paint – Muted Orange
- Natural Jute Twine – Dollar Store
- Fall Silk Leaf Stem – Dollar Store
- Wine Cork - Recycled
- Serrated Kitchen Knife
- Glue Gun and Glue Sticks – Dollar Store
- Paintbrush
- Scissors
- Ruler
Instructions
- Gather all materials. Carve a 2” hole in the top center of the foam pumpkin with a serrated kitchen knife. The fun part about the Dollar Store pumpkins is that they are hollow inside.
- Basecoat the pumpkin with muted orange acrylic craft paint, let dry. Since the pumpkin will be covered with yarn, no need for a second coat.
- Measure and cut 72 lengths of muted orange chunky yarn to 26” long with scissors, creating 12 bundles of 6 strands each.
- Tie the top of the 6 strands of chunky yarn with natural jute twine, securing with a double knot and trimming any long ends with scissors.
- Separate the 6 strands into three pairs of 2 strands each. Loosely braid the muted orange chunky yarn. Secure the bottom with natural jute twine. Repeat 11 more times, creating 12 braids total.
- Using a glue gun and glue sticks, secure the center of the first braid across the base of the pumpkin. Hold the braid down with the blades of the scissors until the glue has cooled. This trick will prevent burning fingertips. Creating a cross pattern, attach the second braid to the base of the pumpkin with a glue gun and glue sticks.
- Once the glue has cooled, flip the pumpkin over and insert the tail ends of the braids into the carved hole, tucking in tightly.
- With the remaining 10 braids, fold them in half and glue around the base of the pumpkin. Press the yarn into the hot glue with the blade of the scissors to create a good adhesion to the pumpkin.
- Once the glue has cooled, flip the pumpkin over and carefully insert all the ends of the braids into the carved hole, tucking everything in tightly. Shift the braids around the pumpkin to fill in any holes.
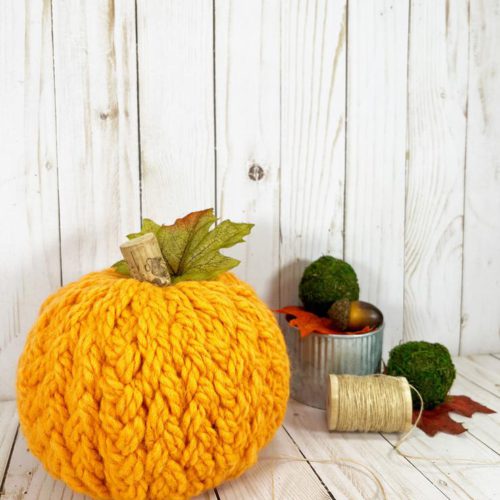
- Insert a recycled wine cork into the top of the pumpkin as the stem. Secure with a glue gun and glue sticks.
- Cut a leaf from a bunch of fall silk leaves using scissors. To finish, attach next to the wine cork stem using a glue gun and glue sticks.
Tried this recipe?Let us know how it was!