DIY Dollar Store Fall Decor - Halloween Sign
Are you ready to jump into Fall? Why not make these super cute DIY Dollar Store Fall decor idea.
Ingredients
- 1 Dollar Tree Halloween Sign
- 1 Dollar Tree Wooden Plunger
- 1 Dollar Scarecrow Decoration
- Glue gun and glue sticks
- Ruler
- Sharpie marker
- Glue gun and glue sticks
- Utility knife
- Scissors
- Scrap piece of ribbon
Instructions
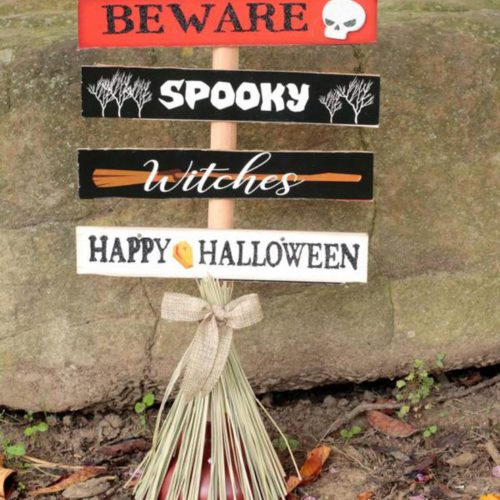
- Turn the sign over so the back is facing up. Using the ruler and Sharpie marker, make horizontal lines which line up in between the “sayings” on the front of the sign.
- Using the utility knife, “score” a line across each of the Sharpie lines you’ve drawn. Turn the sign over and “score” under each “saying”, which will line up where you made each of the lines on the back. Lay the sign on top of a hard surface (like the edge of a table or countertop) and line up the “scored” line against the edge and gently put firmly tap the sign and it should snap off quite easily.
- Plug in your glue gun. While waiting for the glue gun to heat up, determine where you want to place each sign on the wooden handle of the plunger. Once the glue gun is hot enough, use a generous amount of glue on each sign and attach to the handle. Hold in place for 10 seconds. Repeat until each sign is attached.
- If you remove the scarecrow face from the decoration, you will see a miniature broom. The broom has a twine wrapped around it. Using your scissors, cut ABOVE the twine.
- Lay the sign on it’s back on a flat surface. Position the broom on the front of the plunger handle, under the last sign piece. Using your ribbon, tie the broom securely to the handle. If you like, you can use your glue gun to secure it as well. Attach the rubber bottom to the wooden handle. Stand up your Dollar Tree Wooden Plunger Witch’s Halloween Sign and using your scissors, trim the excess straw from the bottom until it is flush with the rubber bottom of the plunger. Now you have a fun Halloween decoration to enjoy!
Tried this recipe?Let us know how it was!